Updated January 20, 2022
How to make a plaster mold for ceramics showing the single most important step for success or failure
Intro for mold making
If you are working in almost any area of ceramics you can likely use plaster molds to assist making various forms. Bowl or hump shaped molds are very common when handbuilding forms. Slipcasting exclusively uses plaster molds to make its forms. I will show you how I make the simplest type of mold in this article, the one piece plaster mold. I go into the detail for the single most important aspect, choosing the form you will use to make a mold.
To make it easy to find, here is a timelapse of the process described below.
Video of process
Set up
Here’s a list of items you will need:
- A form that you will use to make a mold. This is commonly called a model. For any kind of mold there are some characteristics you will need to pay attention to that I cover in the article. This first step, choosing your model, is by far the most important step.
- Plaster, for slipcasting the standard is USG No.1 Pottery Plaster. Handbuilding clay doesn’t specifically need the No. 1 Pottery Plaster for bowl or hump molds. Regular Plaster-of-Paris from a hardware store would be just fine. Link to USG’s Product info sheet for No 1 Pottery Plaster
- A form release agent. Murphy’s soap mixed with water is commonly used. This will help keep the container you pour the plaster in clean and also to help release the plaster from the model.
- An appropriate surface to pour the mold on. Laminate or stone counter work surface or sheet of plexiglass would all work. You could even just pour plaster on a plastic sheet.
- Material that will contain or box in the plaster when you pour the mold. They are called cottles and I show you a few kinds you can use.
- Clay to seal the container used when pouring the mold. Water or oil based clays are typically used. Art supply stores have these.
- Cleanup is important and you should prepare a cleanup area before you mix your plaster. Plaster CAN NOT GO DOWN YOUR SINK DRAIN! I use a three part cleaning station in the studio that does not rely on cleaning anything in a sink. It consists of two 5 gallon buckets half full of water. Then a box with a contractor garbage bag liner. When you see how I deal with the cleanup in the article you should be able to get an idea of how to deal with your own situation.
- You will need a couple of utility sponges for cleaning.
- Safety needs must include a dust mask or best, a respirator. Minimum is a N95 dust mask. Gloves are optional. I never use them for plaster work. However, some people I hear say plaster dries out their hands.
- Wish list not absolutely necessary but helpful: drill with mixing paddle, brush for bottom of mold to get bubbles out, hammer or mallet to bang table to also release bubbles.
Planning to make a mold
The whole point to making a mold is to have the ability to easily replicate a form. In this article I am describing the most basic type of mold which is only one part. Reviewing the model or shape you will make a mold of is the most important step.
Here is a plastic tub (which is a cylinder) I will use to make the one part plaster mold featured in this article. It’s a simple shape and will only require a one part mold. I want to discuss why it’s good for a one part mold.

The number of parts a mold has is governed by how complex the shape of the form is. Below is a photo of a plaster mold I made for a shell which needed to be four parts
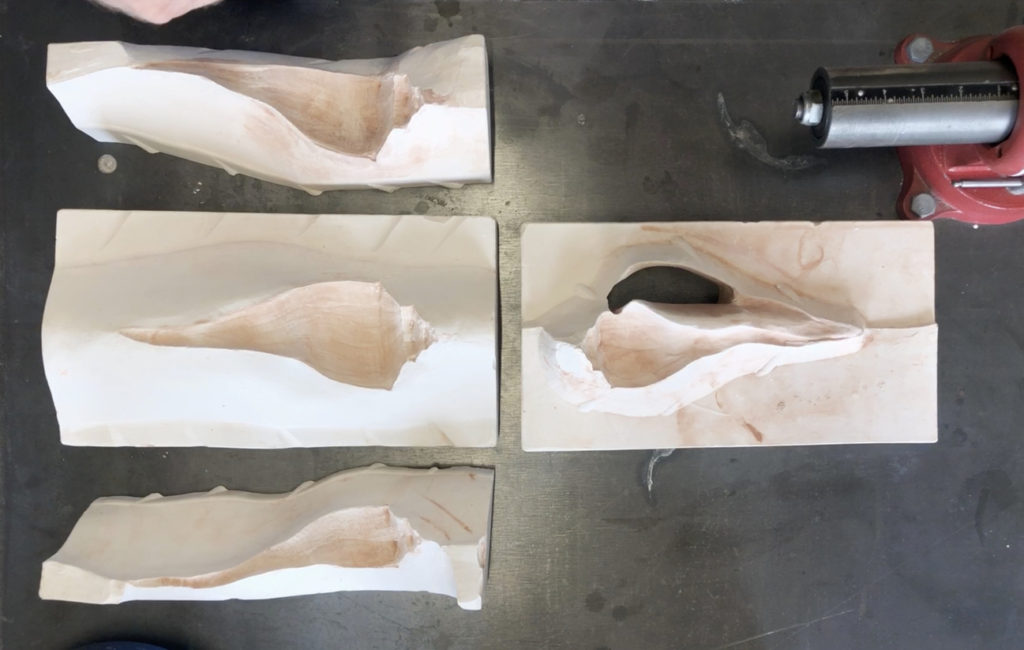
The reason I needed four parts revolves around the ability to get the model, a shell in this case, out of the plaster mold. If I poured plaster all around the shell I could not have taken it out of the plaster mold. That’s completely understandable to anyone.
What confuses beginners are the more subtle levels of that idea. We call them undercuts or projections. Simply put, if the model’s shape is such that something about it prevents the model from sliding out of the plaster, like a lip or some protrusion, we call those undercuts or projections.

Let’s take a close look at an obstruction that would stop a model from being released from a plaster mold.

If you have a model that is so simple there is no chance of it getting caught, mint, good for you, no need to dig into more detail. You may jump ahead to the next section:
But if you have a form that you are not sure about, read on as I dig deeper.
At the most subtle level, the slightest shape can be an undercut. Something 1/32” of inch, even 1/64” of an inch can make it impossible to get a model out of plaster mold. Thats subtle and easily missed when you’re getting ready to make a mold. Plaster is absolutely unforgiving regarding this fact.
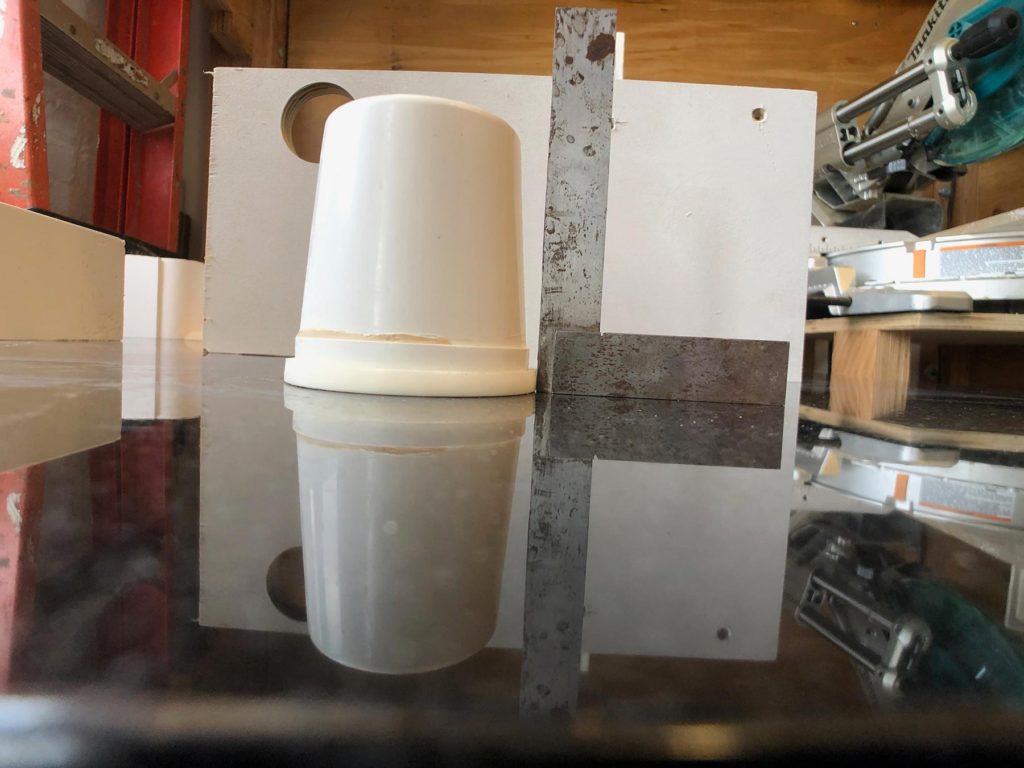
So, like in the photo above, use a square and check your form. Make sure there is no chance that something about the form is not larger than the opening. The lip on the jar above is larger than either end. It would not allow that jar to be removed from the plaster.
Here are a some other examples to refine our view of undercuts and projections.

The thermos above, good or does it have undercuts/ projections? The letters project, they would get stuck in the plaster. You could never take it out of a one part plaster mold.
I am not saying a plaster mold can not be made of the thermos. But it would require at least a two part mold. Like two halves that opened up. A one part mold is about sliding the model out of the plaster mold. The thermos would not slide out.
How about this one:

How about a plastic pipe? Any undercuts or projections? No, there are none. In another article I am working on I make a mold of plastic pipes to use in conjunction with other one part molds. This shape would be at the limit of shapes that would slide out of a plaster mold. But, they in fact slide right out.
My little plastic tub, all good, no undercuts or projections. In fact, I only wanted the smooth part of the tub to be cast in plaster so even the ridges of the top are not cast in my mold (see the video above and see how I cut foam core to hide the lid kind of making a false bottom in the cottles) so I made the simplest shape possible.
The material to contain the plaster
In my daily studio life I use cottle boards. Here is a video where I discuss the types I use in the studio.
When I made the one part mold I used my plastic cottles.
Onward to making a mold, first, place the model
One consideration for making your mold is the buoyancy of the model. If the model will float something will need to be done to prevent it. One thing a person can do is screw the model down from below if you’re using a foam core cottle system. Maybe it can be hot glued down to the foam core or whatever table you’re using.
The PVC pipe pictured above is hollow and plastic. It’s gonna float! I prevent that by filling the inside with clay which will be a ballast of sorts. Even a glass turned upside-down can float. Any hollow form should be filled with clay.

Whatever the case, there is no holding down the form when you pour the plaster. You have to make accommodations before you pour to make sure the model doesn’t move or float.
Second, get the cottles arranged and apply the form release
Once the model is set on your table or base you want to put the cottles around it. A plaster mold should generally be about 1-1/2 inches thick around the mass of the model. If there are small protrusions that create spots that are only 1 inch, that’s fine. As long as most of the mold thickness will be 1-1/2 inches. Thicker is okay too although don’t think thicker is better. You won’t gain anything by having a really thick mold.
If you’re making a slipcasting mold, there is a common idea that the thickness should be as consistent as possible. That thicker and thinner parts will cast differently. In my experience, it’s hard to do sometimes. If I have a weirdly shaped form sticking out in all kinds of strange ways I can’t make a mold that has a similar thickness everywhere. I’ve never had a problem with variations. So I say don’t worry about that too much. Do the best you can.

After the cottles are arranged, you need to “waterproof” the cottles. See photo above, I roll clay into long small strips and press into the corners. The photo shows the clay inside the cottles. Truth is, I usually put it outside the cottles. Keeps the clay clean and my plaster molds come out perfectly square at the corners.
In the video above (at the beginning of this article) when I make my mold, I used my plastic cottles. I used clay for the foam core false bottom to stop the plaster from getting below the foam core but not in the corners. My plastic cottles are made so they don’t leak. Usually I don’t use clay at all with them.
I use a mix a 70:30 Murphy’s Oil with water as a release agent. I brush two coats on the form. If I was using my wood or plexiglass cottles I would also put it on those. If I am casting on a table top directly I always coat that too. Plastic sheeting doesn’t need it if you’re lining the cottles with that or covering a table top with it.
Brush one coat on, let it dry for a few minutes then apply a second coat. A note about Murphy’s Oil on your model. After the second coat dries, brush strokes will be slightly visible if the texture of the model is smooth. I take an almost dry sponge (just ever-so-slightly damp) or a soft cloth and gently go over the surface of the model. This will smooth out those brush strokes so they don’t cast into the plaster.
Mark the height of where the plaster will be poured on the cottles. You won’t be able to see the model and won’t know if you have enough coverage if you don’t have a top pour line that you can see.
Time to mix plaster
You’re all set, the model is secured. Cottles in place. Corners and all seams waterproofed with clay or in my case I use the plastic cottles that do not leak. You may be using foam core with hot glued seams, that’s fine. Even lining a box with plastic would work, as long as it will hold water. Murphy’s Oil release applied. Clean up area all set up.
Time to mix your plaster. How much to use? What ratio plaster to water?
I have a chart of cubic inches to plaster to water weights below. It’s based on the cubic inches of the mold you will be making. I go through it all below.

You can download a PDF spreadsheet of my chart here, it includes ounces!
Quick review measuring my volumes.

My case was 5 inches by 5 inches and 4-1/4 inches high. That’s 5 x 5 x 4.25 = 106.25 cubic inches. Then I need to subtract the model, which in my case is a cylinder.

πr2=area of a circle. If our diameter is 2 inches, then the radius is 1 inch. 3.14x1x1=3.14 square inches area of the base.

Square inches of base x height. The height of my cylinder was 3 inches. 3.14 x 3 = 9.42 cubic inches for the cylinder.
The overall cottle area is 106.25 cubic inches minus the cylinder of 9.42 = 96.83 cubic inches. I round up to 100 cubic inches.
So my mold will have 100 cubic inches of plaster. Next, I use the chart above to find out how much water and plaster is needed. I used 1,134 grams of water and 1,559 grams of plaster.
Make sure you use cool or cold water. Warm water makes the plaster cure faster and we don’t want or need that.
The mixing container should be big enough to mix the plaster after it’s added. About double the volume as the water is sufficient. The plaster won’t double the volume of the contents when added but you need room to mix and not slop out of the container.
The plaster is added to the water, not the other way around. If water is added to the plaster, the mix will clump and have dry pockets.
I use a plastic cup to add the plaster to the water. The speed is moderated so the plaster doesn’t clump up too much. Certainly not just dumped in all at once. The plaster is kind of sifted or shaken as it is poured out of my bucket.
I usually time everything. After adding the plaster to the water the mix has to sit or rather slake for at least 1 minute. Slaking is the process of the plaster particles getting saturated with the water. However, it’s not being mixed. It could actually slake for up to about 30 minutes and be just fine. We only need a minute for slaking to be effective.
Take a breath, it’s about to get real
Take a breath because the clock is about to start running. Like I said, I time everything. Time the slaking time to make sure the mix sat for at least a minute, although I prefer 3 minutes, undisturbed while the plaster soaks up water. Then once you start mixing you want to be efficient. Not because it can go wrong all of sudden. Mostly to make sure you have enough time to clean your containers thoroughly.
Mixing plaster is about the amount of mechanical energy used to stir it up. I use a drill with the mixing paddle for 2-3 minutes. I run it on a cordless drill at about 3/4 speed. Sometimes I mix by hand. When I mix by hand I mix for 3 minutes or more because my hand can’t deliver as much energy as the drill. The length of time I mix depends on how much plaster I’m making. Half a gallon (2 liters) or less, I will mix for 2 minutes with my drill. More than half a gallon, then 3 minutes.
I got that all from a USG trainer in a workshop. If you mix longer the plaster will set up faster. That’s not ideal. Once the plaster starts setting up it’s game over. You can’t make it stop! So time the mixing. I use the stopwatch on my cell phone and keep it close to where I’m mixing so I can watch the time.
Pouring the plaster
Air bubbles are the bane of all mold makers. Pouring to minimize them will give a better finished mold.
So it’s best to pour the plaster next to the model. Pour in one spot and not too fast nor too slow. Try not to pour onto the model itself.
If the model is not too deep/ tall, I like to fill the plaster so it just covers the model. Stop, take a cheap chip brush and brush over the surface of the model. That means putting the brush in the plaster and brushing the surface of the model. This releases air bubbles that are stuck to the surface of the model. You can’t see what’s going on but rest assured it helps. I know it helps my molds for sure.
Finish filling the mold with plaster. Then, get your hammer or mallet and without breaking your table bang on the bottom of the table. Again, to loosen the air bubbles. If the cottles can handle it, give some bangs too.
Cleanup and Demolding
That plaster is getting hard in the container. Don’t waste any time, get over to the cleanup area.

Swish your brush and leave it in the water. Get after the bucket. First, if you had too much plaster, scrape the sides of the bucket and get as much as possible into the garbage bag (see my box with a bag inside above). Then with a small container I pour some water in the bucket and run my hand around all the surfaces quick. Dump that into the dirty water bucket. Pour some more clean water and run your hand around again and dump that water. Then more water but by now you can switch to a sponge to wipe the inside. Then get around the outside of the rim, water, wipe, dump repeat until you finish with the sponge. I never dump into the clean bucket.
You have to be careful with the sludge. Please don’t dump it down your drain. If you let it settle for days you can slowly dump the clear water off the top. Then put the sludge in a plastic garbage bag or best, dump it outside.
Don’t forget the brush, clean it with your hand. Also the sponge, get all the plaster off because any left on it will dry.
Failing to clean well and leaving plaster in or on your container causes two problems.
A: The next time you mix in a bucket with old dry plaster, the new mix is effected by the crusty old stuff. It causes a mix to cure faster. A USG trainer taught that in a workshop. Clean tools and buckets are imperative.
B: If you try and clean the crusty stuff out you will end up using some metal object to do. When you scrape the plastic bucket you will scratch it. Then when you pour next time the scratches become places the plaster likes to stick to. Making it harder to clean and will likely end up being places crusty old stuff builds up.
Clean your equipment nicely, please.
Keep you garbage bag until after you remove the cottles and clean the table.
Remove the cottles
30 minutes should be a good amount of time to wait to remove the cottles. If you feel the mold and it’s warm, which will be after about 30 minutes, the mold generally is quite strong at that point. You can slide the mold out of the way so you can clean the work table then. But don’t take the model out of the mold yet. The plaster surface will be soft next to the model. You want to wait 24 hours to take it out.
Remove the model the next day
If you did good, the model should come out with no difficulty. See the video at the beginning, my plastic tub slid right out.
Once the model is out of the mold some clean up could be done. Typically the corners are beveled with a SurForm rasp. The idea being that you don’t want chips of plaster to get in the clay. The sharp corners tend to chip easily so we rasp them off.
In the video I also do hand lapping of the top surface. That is so I can stack other mold parts on top and have a tight fit. I’m writing my next article on using multiple one part molds together to create new and interesting shapes. Should be out by early July 2020.
There are many people that wrongly believe any plaster, even dust, that gets in clay will cause it to explode in the kiln. Completely false. I have fired plaster many times. It fires the same as clay although it becomes fragile. It tends to fall apart.
If a chunk of plaster gets in a clay piece it will cause some kind of breakage since it doesn’t shrink as much as clay. That’s the problem just a different shrinkage rate. So in a kiln any plaster chunk buried in clay will cause the clay to break and a piece of it will fall off.
The mold could be dry enough to use for hand building in a day or two. Slipcasting molds usually like to dry for 4-5 days. Temp, humidity and air movement (the more, the faster it will dry) are the main factors for mold drying times.
I saw someone put two fans on a mold that was set next to a kiln that was firing. He dried it over night and was slipcasting out of it the next day. But that was also the Holy Grail of drying situations.
Lifetime of a plaster mold
I have cast in molds up to around 50 times. The fidelity of the surface starts decaying or maybe I would say the crispness of the texture erodes. In my own work that’s not really a bad thing so I have used molds for much longer than that.
It will be evident to you. If it’s a smooth texture, a little fine wet/dry sandpaper could freshen up the surface.
The plaster itself will last decades easily. It’s pretty robust stuff.